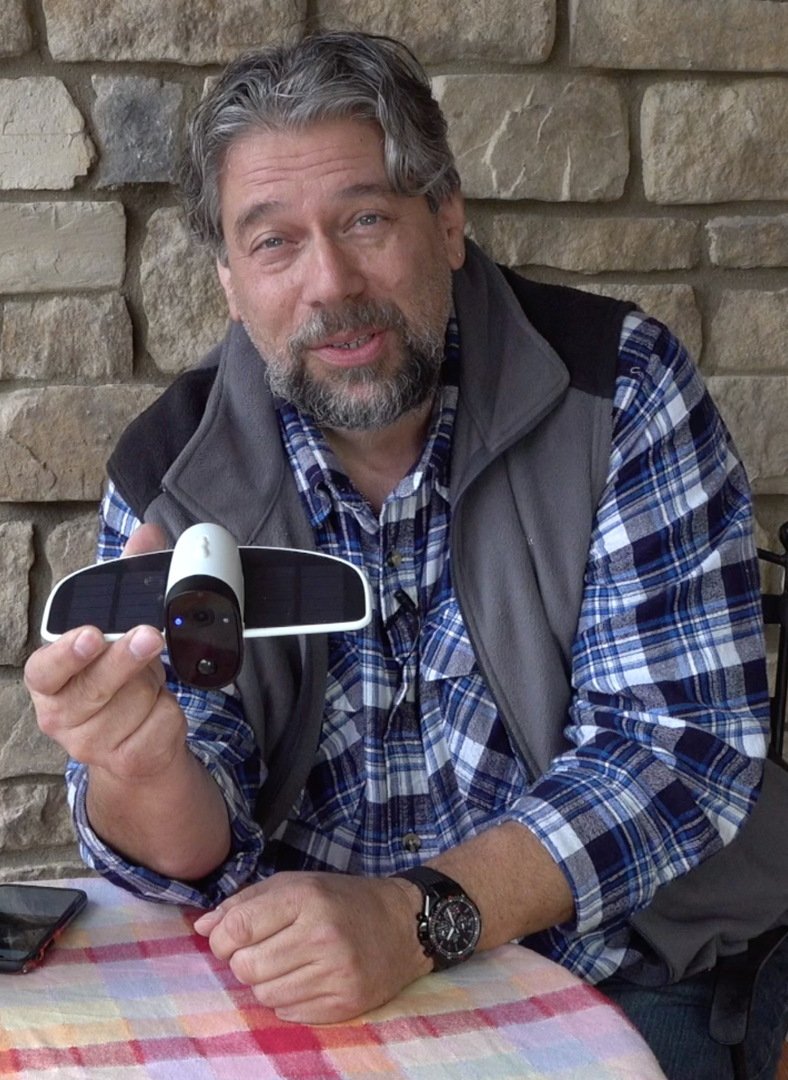
Many of you guys might know about the various solar power CCTV cameras and might be considering the option to install one of the cameras. In this article, I am going to introduce you guys with Soliom S60 solar power camera that I am presently using. Hello, my name is Dave Taylor, and I am going to tell you about various features along with the advantages and disadvantages of installing this camera.
So, let’s start with the features of the camera first.
This camera is easy to install
One of the best things about this camera is the easy installation process. You can even mount that in trees how cool is that, its shape like a bird. These cameras come with a user manual that has detailed step by step guide for its installation. I just needed to drill some holes on the wall for installing Soliom S60 solar camera. The total time that I spend on installing this camera was about 5 minutes. The only factor that I was advised to consider was the exposure to the sun. Another advantage of these cameras would be the 160-degree wide area. It has a micro SD card under the bottom with supports from 8 to 64 gigs which are more than enough to record a video in HD.
Day And Night Surveillance
The quality of the video is pretty smooth and clean without any lag. This camera is powered by solar energy during day time, and at night, it would be powered by batteries. This camera has an eye starlight night vision where the whole sensor light up where you saw a blue bunch of dot light. Now my cameras are free from any power disruptions, which are common in our locality during the rainy season. The Soliom solar camera comes with a 4000 mAh battery that can provide power for about 12 hours. During the day, these batteries would get charged with the help of sunlight.

Connectivity of this camera
It works with an app that gives real-time notifications on your device. Another great thing about this camera would be wireless connectivity. For the proper setup, I downloaded the android application from the Soliom website as I have an Android smart phone. This app is also available for the iOS platform if you are an iPhone user. The setup process is pretty easy and was completed within a few minutes.
What’s in the box?
- Soliom S60 HD camera
- Initial charging cable
- Instructions
- Set of screws for installation, a screwdriver
- A mounted pole

After mentioning various features, now let me describe multiple advantages and disadvantages of this camera. Here are some of the advantages of installing the Soliom solar camera.
- This camera is eco-friendly. This camera is fully powered by solar energy, thus won’t cause any harm to the environment
- Another advantage of this Soliom solar camera would be the waterproof body structure. As our locality experience, lots of rain, having a waterproof camera proved beneficial to us.
- This bird-shaped camera also has IR night mode. This allows the camera to capture clear footage during the night time
- Its IP66 weather resistance camera it means it can handle from -4 or to 140 F degree temperature. It means it can survive in rain and snow
No Customer review would be completed without mentioning the disadvantages of this camera.
- The only negative point that I experienced after installing would be the delay in reporting after the camera detects any motion in my premises. This is also applicable for footage loading. The system takes a few seconds to load the recorded footage. It depends on the network or Wi-Fi strength.
Finally lets come to the price, the Soliom S60 camera would cost you $139.00 on Amzon.com. If you really need security, I suggest you check this out, so this is Dave Taylor am going to put this back on my wall. Goodbye!


Leave a comment
This site is protected by hCaptcha and the hCaptcha Privacy Policy and Terms of Service apply.